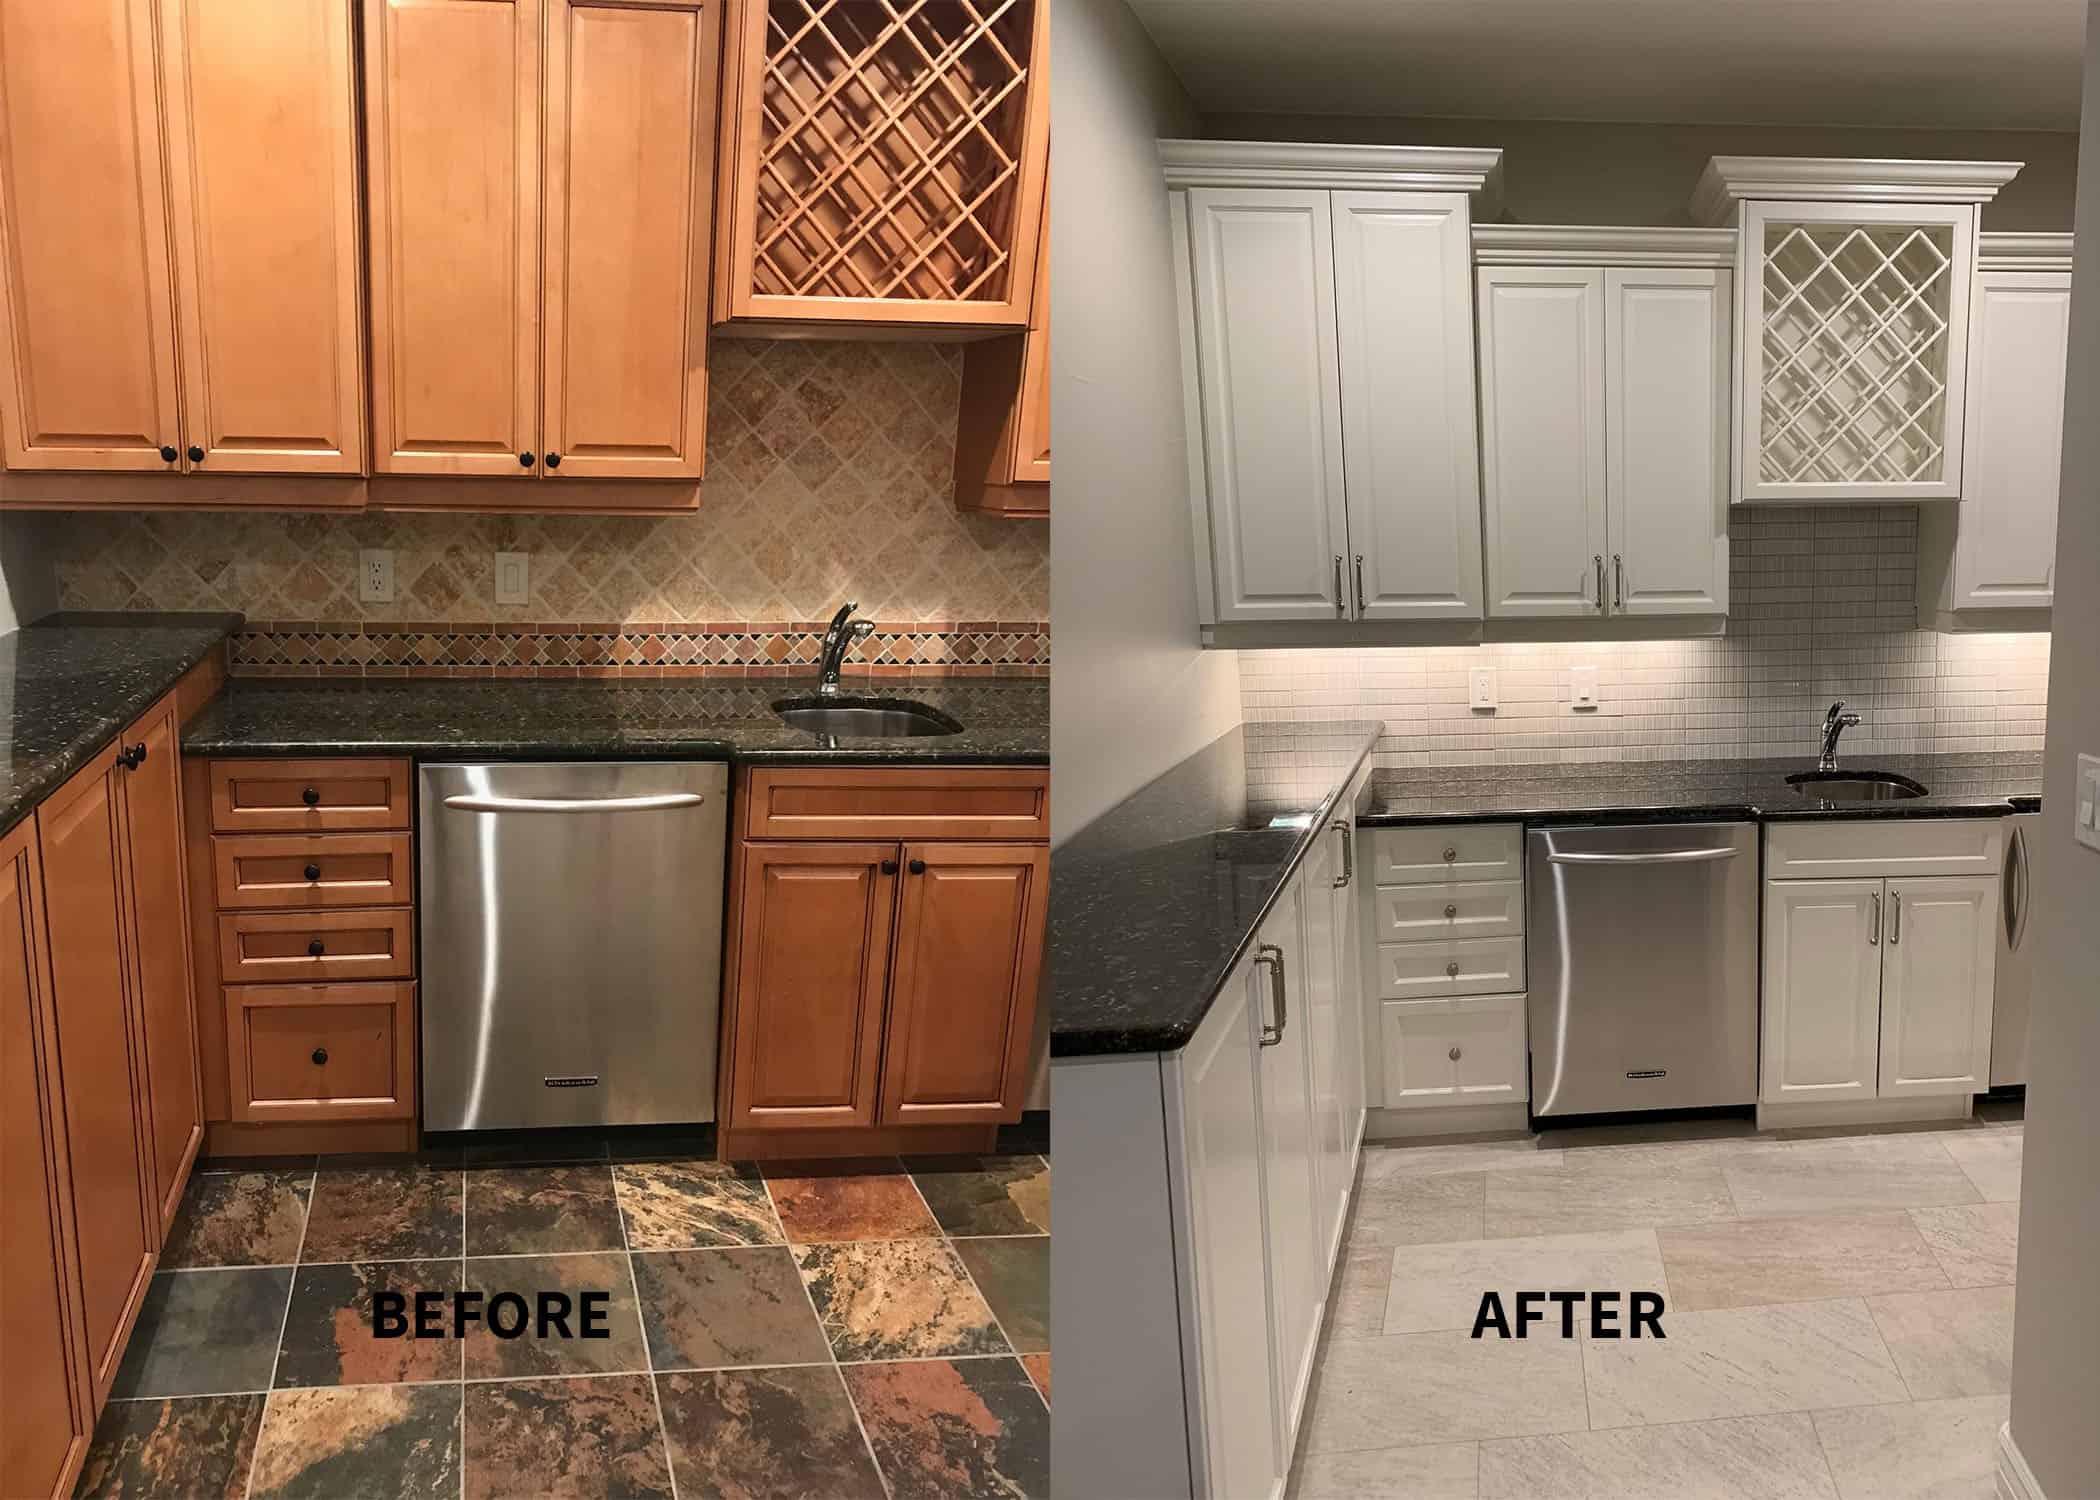
Cabinet Painting Before Installation

Painting kitchen cabinets is a significant undertaking, and the timing of this process—before or after installation—can significantly impact the final result and overall project cost. This section will delve into the advantages and disadvantages of painting cabinets *before* they are installed.
Cabinet Painting Before Installation: Advantages
Painting cabinets prior to installation offers several key benefits. The most significant advantage is improved access. With cabinets lying flat or easily maneuverable, all surfaces are readily accessible for thorough and even paint application. This eliminates the challenges of reaching awkward corners and crevices that are inherent in painting installed cabinets. Furthermore, pre-installation painting allows for a more meticulous and controlled process, reducing the risk of drips, runs, and uneven coverage, resulting in a superior, more professional-looking finish. This is particularly beneficial when working with intricate detailing or complex cabinet designs.
Cabinet Painting Before Installation: Disadvantages
While pre-installation painting boasts advantages, it also presents potential drawbacks. The primary concern is the increased risk of damage during handling and installation. Unprotected painted surfaces are vulnerable to scratches, dents, and chips during transport, storage, and the installation process itself. Even minor bumps can mar the freshly painted finish, necessitating costly repairs or repainting. Additionally, the weight of painted cabinets can be greater than unpainted ones, increasing the potential for accidents during installation. Proper protective measures, such as careful handling and adequate padding, are crucial to mitigate these risks.
Cost-Effectiveness of Pre- and Post-Installation Painting
The cost-effectiveness of painting before versus after installation is a complex issue with no single definitive answer. While pre-installation painting may initially seem cheaper due to easier access and potentially faster application, the added cost of protective measures and the risk of damage must be factored in. Post-installation painting, although more challenging, eliminates the risk of damage during handling. However, the labor costs may be significantly higher due to the difficulty of accessing all surfaces. The actual cost comparison hinges on factors like the cabinet design, the painter’s skill and efficiency, and the extent of any necessary repairs.
Comparison of Pre- and Post-Installation Painting
The following table summarizes the key differences between painting cabinets before and after installation:
| Pre-Installation Painting | Post-Installation Painting | |
|---|---|---|
| Ease of Access | Excellent; all surfaces easily accessible. | Difficult; access to some areas may be limited or impossible. |
| Risk of Damage | High; risk of scratches, dents, and chips during handling and installation. | Low; minimal risk of damage once installed. |
| Cost | Potentially lower labor costs, but higher risk of damage repair costs. | Potentially higher labor costs due to difficulty of access. |
| Overall Time Investment | Potentially faster painting process, but added time for protective measures and potential repairs. | Potentially longer painting process due to limited access. |
Methods and Techniques for Pre-Installation Cabinet Painting
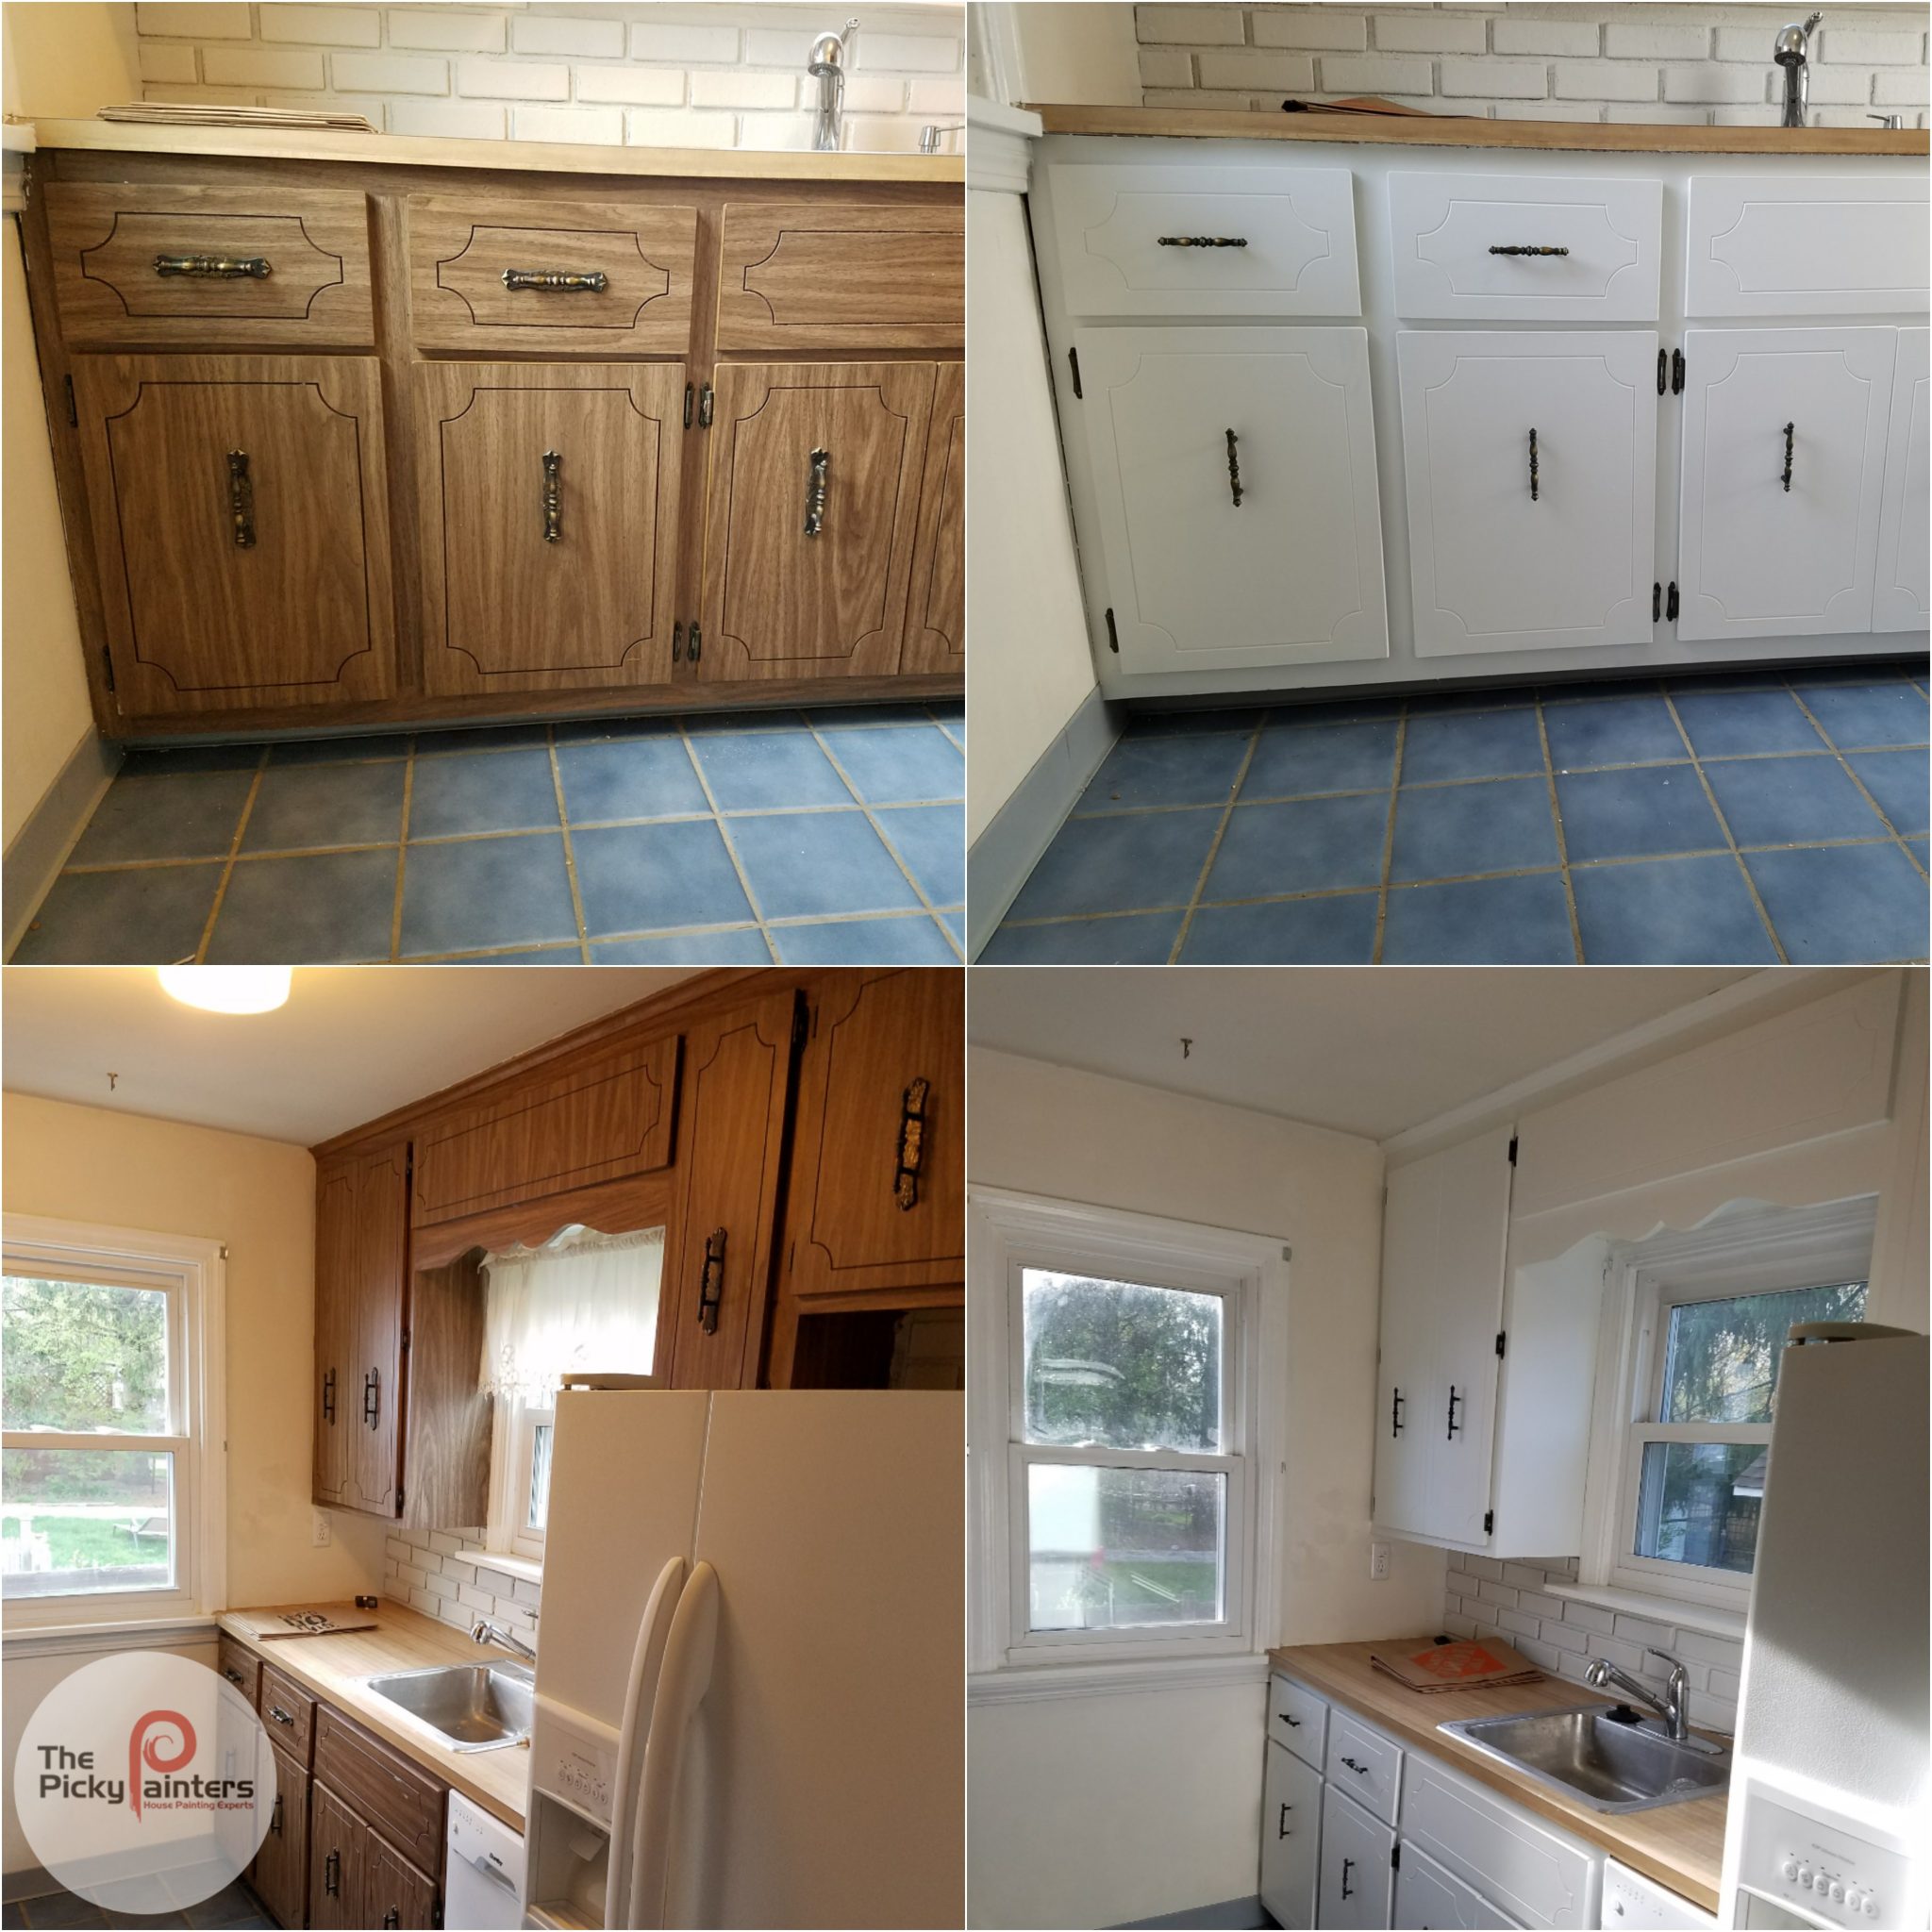
Painting kitchen cabinets before installation offers several advantages, including easier access to all surfaces and a more controlled painting environment. This approach minimizes the risk of drips, smudges, and damage to already installed cabinets. Proper preparation and technique are key to achieving a professional-looking finish.
Cabinet Preparation for Painting
Thorough preparation is paramount for a durable and beautiful paint job. This involves a multi-step process ensuring the cabinet surfaces are clean, smooth, and primed for optimal paint adhesion. Neglecting this stage can lead to peeling, chipping, and an uneven finish.
- Cleaning: Begin by thoroughly cleaning the cabinet surfaces with a degreaser to remove any dust, grease, or grime. A mixture of warm water and mild dish soap is often sufficient. Rinse well and allow to dry completely. For stubborn stains, consider using a stronger degreaser, always following the manufacturer’s instructions.
- Sanding: Once dry, lightly sand the cabinet surfaces with fine-grit sandpaper (180-220 grit). This step smooths out any imperfections and creates a better surface for primer adhesion. Focus on any rough areas or imperfections. After sanding, wipe down the cabinets again with a tack cloth to remove sanding dust.
- Priming: Applying a high-quality primer is crucial. Primer seals the wood, preventing the absorption of paint and promoting even color coverage. Use a primer specifically designed for cabinets and apply two thin coats, allowing each coat to dry completely before applying the next. This ensures proper adhesion and prevents bleed-through of the wood grain.
Painting Techniques for Pre-Installed Cabinets
Several painting techniques can be employed, each with its own set of advantages and disadvantages. The choice depends on factors such as the size of the project, the desired finish, and personal preference.
- Spraying: Spray painting provides a smooth, even finish and is ideal for large projects. However, it requires specialized equipment and proper ventilation to avoid inhaling paint fumes. Overspray can also be an issue, requiring careful masking of surrounding areas.
- Brushing: Brushing offers excellent control and is suitable for detailed work and smaller projects. It requires more time and effort than spraying, and brush strokes might be visible if not applied carefully. Using high-quality brushes minimizes the appearance of brush marks.
- Rolling: Rolling is a faster method than brushing, suitable for larger, flat surfaces. However, it can be challenging to achieve a completely smooth finish in corners and crevices. Using a high-quality roller with a short nap will help minimize texture.
Paint Selection for Cabinet Painting
The type of paint chosen significantly impacts the durability and longevity of the finished product. High-quality paints designed for kitchen cabinets are essential for withstanding daily wear and tear.
Do you paint cabinets before installing them – For pre-installed cabinets, consider using a durable, high-gloss or semi-gloss paint. These finishes are more resistant to moisture, scratches, and stains than matte or eggshell finishes. Latex paints are a popular choice due to their ease of application, low odor, and quick drying time. Alkyd paints offer excellent durability but require more time to dry and have a stronger odor.
Visual Representation of the Cabinet Painting Process, Do you paint cabinets before installing them
Imagine a series of panels depicting the cabinet painting process.
Panel 1: A close-up shows a cabinet door being cleaned with a soapy sponge. Caption: “Thorough Cleaning: Removing grease and grime is the first crucial step.”
Panel 2: A cabinet door is being sanded with fine-grit sandpaper. Caption: “Surface Preparation: Light sanding ensures a smooth surface for optimal paint adhesion.”
Panel 3: A painter applies primer to a cabinet door with a brush. Caption: “Primer Application: Two thin coats of primer create a uniform base for the paint.”
Panel 4: A painter sprays paint onto a cabinet door using a spray gun. Caption: “Spray Painting: This technique provides an even finish for larger projects.” (Alternative panel could show brushing or rolling).
Panel 5: A finished, beautifully painted cabinet door is displayed, showcasing the glossy finish. Caption: “The Finished Product: A durable, professional-looking finish that will last for years.”
Addressing Potential Issues and Solutions in Pre-Installation Painting: Do You Paint Cabinets Before Installing Them
Pre-painting your cabinets offers significant advantages, but it’s crucial to anticipate potential problems to achieve a flawless finish. Careful preparation and meticulous technique are key to avoiding common pitfalls and ensuring a professional-looking result that stands the test of time. Understanding these challenges and implementing the appropriate solutions will save you time, effort, and potential frustration down the line.
Chipping and Damage Prevention
The biggest risk with pre-installation painting is damage to the freshly painted surfaces. Cabinet doors and drawers, particularly, are vulnerable to chipping and scratching during handling and transport. To mitigate this, prioritize the use of high-quality, durable paints specifically formulated for cabinetry. A durable enamel or lacquer provides superior protection against scuffs and impacts. Furthermore, after painting, apply at least two coats of a high-quality clear coat sealant for added protection. This creates a tougher, more resilient surface that resists chipping. Handle the painted cabinets with extreme care, using soft padding and avoiding direct contact with sharp objects during movement and storage.
Addressing Drips and Uneven Finishes
Drips and uneven coats are common painting issues that are amplified when painting cabinets before installation. The solution begins with proper preparation. Use a high-quality primer designed for cabinets to ensure a smooth, even base coat. Apply thin, even coats of paint, allowing sufficient drying time between each coat. Don’t overload your brush or sprayer to avoid drips and runs. A slow, steady hand is key. For a perfectly smooth finish, consider using a paint sprayer for a more consistent application. Lightly sand between coats with fine-grit sandpaper to create a seamless surface before applying the next layer. Remember, patience is vital to achieving a flawless finish.
Painting Difficult-to-Reach Areas
Accessing all areas of a cabinet, especially intricate details and hard-to-reach corners, can be challenging. Utilize small brushes, specifically angled ones, to precisely paint detailed areas and corners. For the inside of cabinets, consider using a small foam roller to achieve even coverage efficiently. A paint sprayer, while excellent for large surfaces, might not be ideal for detailed areas; use it strategically to complement brush work. For particularly challenging areas, consider using a small artist’s brush for detailed work. Remember to mask off areas you don’t want painted to prevent accidental overspray or paint transfer. This meticulous approach ensures a professional finish on all surfaces.

